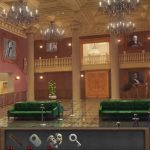
Your adventure opens in a cluttered little chamber with a chair, a toppled plant pot, and an exposed manhole, hiding a screwdriver and stout metal strip. Use those tools to ease creaking doors and slide past a few deceptively simple block puzzles. Next, wander an Antique Shop packed with odd pieces to light, famous landmarks to gather, and silhouettes begging for a match.
Quick mini games with winking gems, sleepy flowerpots, and flipped cards keep your fingers busy. Finish with a color-mix painting puzzle, watch the exit shimmer open, and step through to call the level done. Secrets await, so lean in and enjoy the twisty road ahead.
Level 9 Walkthrough Antique District
- Tap the chair on the right side to collect a Palette and Screwdriver. Move to the left side, inspect the plant pot, and use the screwdriver to retrieve a Metal Bar and a Handle.
- Tap the manhole to find a Key inside. Use the metal bar, but first, shape it into a hook at the same location, then retrieve the key.
- Use the key to unlock the left door. You’ll encounter a sliding puzzle where your goal is to bring the large brown block to the exit.

- You won’t be able to go through yet. Open the nearby box to collect a Mysterious Letter, the Eiffel Tower, a Newspaper, and a Handle.
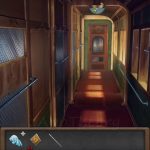
- Slide the newspaper under the door. Use the screwdriver to unscrew the door lock and then retrieve the key that drops onto the newspaper.
- Use the key to open the door, then solve another lock-picking puzzle to proceed to a new area.
- You’re now inside an Antique Shop filled with various items. On the table to the left, move aside some items and collect the Great Sphinx.
- Inspect the trophies above the fireplace; knock down the middle one to get a Matchbox. Pick up a Poker from near the fireplace and use it to push the flames aside.
- Tap the joker image above the table and collect a Loudspeaker. Close the small box on the table to obtain a Lamp.
- Next, use the screwdriver to disassemble the right-side machine and collect a Kettle and a Valve.
- Exit to the sewer area and use the poker to open the manhole. Tap the first sewer pipe to get the Statue of Liberty.
- Light the lamp using the matchbox and place it inside the sewer to illuminate the darkness. Attach the valve, and solve the metal ball pressure puzzle, adjusting all meters correctly to guide the ball to the exit.
- Leave the sewer, use the kettle to collect water from the fountain, return to the Antique Shop, and pour water into the fireplace to extinguish the flames. Collect Big Ben and a key from the ashes.
- Use the key to unlock the right-side door and solve the object-matching puzzle where you must match silhouettes with their real items.
- Enter the room. A snake in a jar greets you. Tap the cupboard on the right and collect a Broom.
- Use the broom to retrieve a key from the board above the Antique Shop door. Head back there, use the key to unlock the treasure chest, and solve the mini-game by connecting the light circuit.
- Open the chest to collect a Disc Record and one of four Rami Crystals.
- Next, open the left showcase using the poker, fix the handle onto the musical device, attach the loudspeaker, and play the disc record to get a Gramophone.
- Return to the room with the snake and place the gramophone on the table. As the music plays, the snake goes to sleep. Collect the Flower Sprout, a Red Gem, and a Paper Clue.
- Go back to the Antique Shop and insert the Red Gem into the armor’s hand to obtain a key.
- Use this key to unlock the cabinet inside the right-side room. Complete the gem-packing puzzle to ensure no gaps are left between pieces. Get two Rami Crystals and a Potion from the cabinet.
- On the same table, pour the Flower Sprout into cup #5, then add the Potion to get a Magic Flower and a Paper.
- Slide aside the purple curtain, reveal a shelf of flower pots, and place the Magic Flower among them to start a mini-game. Solve it by rotating and positioning the flower pots correctly to access a secret compartment with the third Rami Crystal.
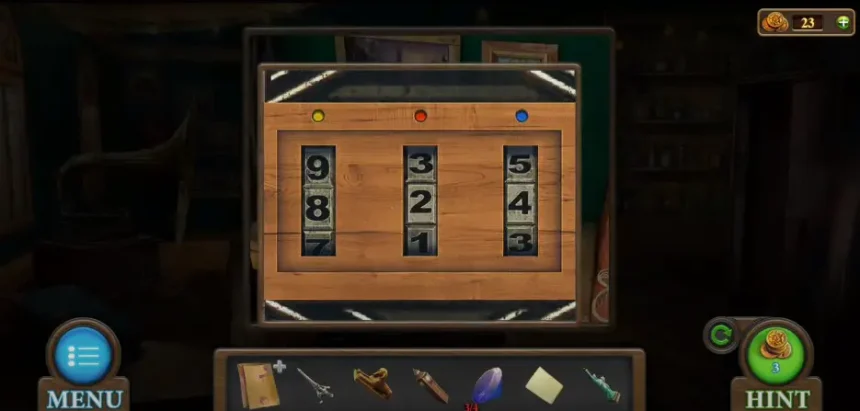
- Examine the small box with three number dials. To find the code, count the number of colored mice across all rooms. Enter 824 to unlock the box and collect three mice figurines of different colors.
- Take the mice to the Antique Shop, and feed them to the cat to receive a Crystal Ball.
- Return to the room and place the Crystal Ball on the red table. A mini-game will begin where the ball shows you an image, and you must select matching cards from six presented.
Solve the card-matching sequence using this pattern:
- This reveals the Sydney Opera House. Use the paper to cover the crystal ball, then take it back into your inventory.
- Now, head to the platform between the two buildings and place all collected landmarks: Statue of Liberty, Sydney Opera House, Big Ben, Great Sphinx, and Eiffel Tower.
- Solving the world map puzzle grants you the fourth Rami Crystal and a Brush.
- Return to the Antique Shop and inspect the blank painting. Place the palette and all Rami Crystals onto it. Attach the paper in the corner of the painting.
Begin the painting puzzle:
- Mix blue + red to make brown. Use it on the first building on the left.
- Use blue to paint the rest of the walls.
- Mix blue + yellow for green, and color the doors and windows.
- Use red to color the windows on the first house on the right.
- Mix white + blue to get gray, then color the mirrors.
- Mix red + white for floor areas and final touches.
- Use yellow for the roofs.
Once the painting is complete, the escape door opens, marking the end of Tricky Doors Level 9.