

In this step-by-step walkthrough guide of Dream Escape: Room Escape, you have to reveal the unknown and the oldest fear. The plot focuses on the strongest human emotion and follows a female character whose distant uncle passed away leaving everything to her. Then, the female character moved to deep mountains and forests in a small wooden house where she started to experience weird and absurd dream every night. Now, she needs your help to figure out what secrets are buried in this house, and it becomes only possible when you start finding hidden objects from surrounding and them playing mini games.
The walkthrough starts with a letter received by a doctor sharing his thoughts on the protagonist’s dreams. Also suggests the girl to visit the place where she usually finds herself in dreams to explore and find the truth. If you are trapped somewhere and don’t know how to find solution, then you must read the Dream Escape Walkthrough and learn how to find unseen truth behind the scenes.

Chapter 1 – Walkthrough
Chapter 1 takes place in the deep forest house that seems odd but fully loaded with strange things, suspense, and dark secrets to reveal. You must find out hidden items and utilize them to solve tricky puzzles.
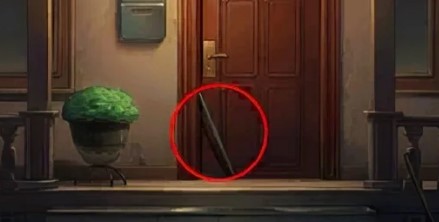
First, collect a wooden stick from the floor next to the door and explore the grass in nearby areas to get a head of the shovel.
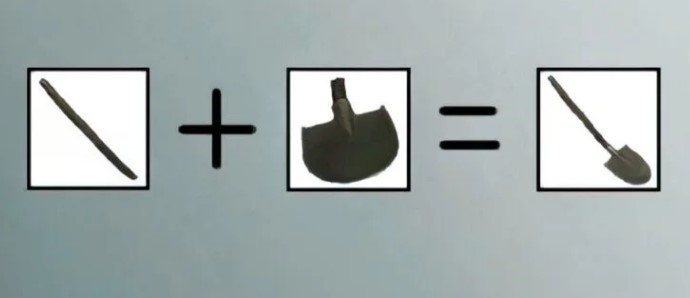
Select both the shovel head and the stick to get a complete small shovel after combining both items.
Use the small shovel to dig the marked area in the soil and obtain an old photo.

Refer to the code shown on the photo to unlock the box beside the door and collect the card inside.
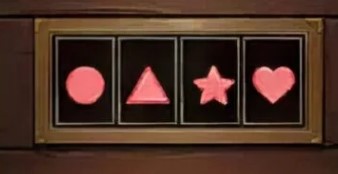
Use the card on the left window to reveal a clue with five colored dots.
Match the dot arrangement to open the nearby box and obtain the door key.
Use the key to unlock and open the door to enter the house and observe the walls and furniture to find four locations that feature a dancing girl pattern.
Inspect the box on the floor and adjust its pattern to match the dancing girl design to collect dog food.
Pour the dog food into the dog’s bowl, and after the dog moves, retrieve the chess piece from its kennel.
Place the chess piece onto the chessboard; after completing the chess mini-game, a key will appear on the board.
Use the key to open the piano lid, lift each piano key, and collect another wooden stick hidden inside.
Use the stick to reach and knock down the envelope hanging from the chandelier.
Pick up the fallen envelope from the table surface.
Open the envelope to find a turntable inside and head to the kitchen and take the knife placed on the stove.
Return to the dining room, cut open the linen bag using the knife, and gather the shells that fall out.
Go back to the kitchen and open the upper cabinet to find a water pipe.
Install the pipe underneath the kitchen sink and try to remove the pot from the stove and turn on the tap.
Fill the pot with water and observe the number displayed near the sink and adjust the pointer on the gas meter accordingly.
Place the filled pot back onto the stove and put the collected shell into the pot.
Turn on the stove, open the shell once it cooks, and obtain a pearl.
Insert the pearl into the eyes of the octopus statue to release a book from under its tentacles.
Exchange the book with the box under the table, solve the puzzle on the box, and retrieve a fuse.
Pick up the biscuit mold placed on the dining room table and install the fuse in the microwave and place the mold inside.
Start the microwave and take out four biscuits, and then insert the biscuits into the grooves of the cabinet above the microwave to unlock it and obtain a triangle-shaped square.
Go to the dining room and use the triangle square to unlock the refrigerator. Collect the key stored inside.
Use the key to unlock the basement door and proceed down into the basement. Solve the mini-game located on top of the box to receive an empty remote.
Take the black cloth hanging from the mirror. Return to the kitchen and wet the cloth in the sink.
Go back to the basement and use the wet cloth to clean the mirror, revealing four sets of numbers.
Use the knife to cut open an apple and find a battery hidden in the core. Insert the battery into the empty remote to make it functional.
Use the remote to turn on the television. Match the numbers from the mirror to a TV channel and obtain the password: 2745.
Return to the dining room and input the password 2745 into the cabinet under the fridge to obtain a crowbar.
Go back to the basement and use the crowbar to pry open the seam of a wooden box to get insecticide.
Use the insecticide on the cockroaches beneath the cabinet in the dining room to uncover a stylus.
Pick up the empty record player from the basement stairs. Install both the turntable and stylus into the record player.
Climb the stairs and enter the room on the right to view the pattern behind the alarm clock.
Examine the closet and adjust its discs based on the previously observed pattern to collect a hammer head.
Check the pocket of the white coat to get a golden clock hand.
Attach the clock hand to the drawer dial and rotate it to the time shown on the alarm clock (X:VI) to get a wooden hammer handle.
Assemble the hammer head and handle together. Return to the hallway and use the hammer to break the cracked tile and retrieve a magnet.
Use the magnet to pull out a key from beneath the bed in the second bedroom. Use the key to open the master bedroom door from the corridor.
Turn on the lights inside the master bedroom. Open the bedside drawer to get the head of an electric shock device.
Return to the second bedroom and collect the handle of the electric shock device from the bed.
Combine both parts to complete the electric shock device. Use the device on the piranha inside the fish tank to safely retrieve the necklace.
Check under the master bedroom pillow to find a wrench. Use the wrench to open the stool and take the glass knife hidden inside.
Use the glass knife to extract the half gem from the necklace. Examine the portrait beside the master bedroom bed to find the four-letter code: DEAL.
In the second bedroom, pick up the small paper showing red, green, blue, and yellow squares. Combine this clue with the password LEAD (a mix of the note and portrait) to unlock the master bedroom table drawer and get the dome for a jewelry box.
Attach the dome to the jewelry box on the low table in the second bedroom and collect the second half gem inside.
Merge the two half gems together and insert the full gem into the ship model and obtain the study room key.
Use the key to enter the study from the corridor. Check both the lampshade and blackboard to connect the letters to the number code 14706.
Use the 14706 code to unlock the desk drawer and collect a bottle of detergent. Return to the living room and use the detergent to clean the portrait, revealing the word: LOVE.
Use LOVE to unlock the glass cabinet in the study and take the pocket watch inside.
Pick up the pencil on the master bedroom table. Find a razor blade on the desk in the study.
Sharpen the pencil with the blade. Use the sharpened pencil to restore the markings in the notebook.
Use the hint (L mark) to set the pocket watch hands to 12:00 (minute) and 3:00 (hour) to receive a ripening agent.
Apply the ripening agent to the flowerpot. Wait until seven colored flowers bloom in the sequence: blue, pink, yellow, purple, orange, red, green.
Use the flower order to solve the bookshelf puzzle and unlock a drawer containing a heart.
Place the heart into the chest of the Christ statue in the hallway to obtain the dark room key.
Return to the basement and unlock the dark room. Complete the Sokoban puzzle next to the pool.
Retrieve the iron box and matches located at the pool’s center.
Return to the living room and use the matches to light the fireplace.
Place the iron box inside the fire. Search the green plants in the dark room and find a red cross.
Insert the red cross into the medical box in the second bedroom and obtain a vase and half of a pliers tool.
Find another vase and a red key on the cabinet inside the dark room.
Read the equations drawn on the tile beneath the dark room wall and decode the 4-circle pattern into 3875.
Return to the corridor and input 3875 to open the wall mechanism and retrieve a vase.
Use the red key to unlock the box under the master bedroom bed and collect a vase.
In the dark room, place the vases in the order: purple, blue, yellow, red to open the drawer and retrieve the other half of the pliers.
Combine both halves to complete the pliers. Use the pliers to remove the wire wrapped around the drawer handle in the dark room table and obtain a screwdriver.
Go to the kitchen, use the screwdriver to open the barrel, and take out the oil pot. Apply oil to the machete lying on the dark room floor and pull it out.
Pick up the iron bucket nearby. Return to the kitchen and fill the bucket with water. Use the water to extinguish the hot iron box in the fireplace.
Use the machete to break the weak iron chain. Retrieve the letter and key design drawing from the unlocked box.
Dial the number 89653 found in the letter using the phone in the study. Take the turnplate from the table in the garage.
Install the turnplate into the floor safe in the study to unlock it and receive half of a gear knife.
Get the ear of rice from the hanging picture in the corridor. Feed the rice to the cow in the garage to make it lean down and reveal the gear shifter.
Use the crank to open the car door and collect both the metal adhesive and a rag. Use the rag to wipe the car’s license plate and read the number: NTW-487.
Use the license plate number to unlock the drawer and collect the other half of the gear knife. Combine both halves to assemble the full gear knife.
Use it to solve the mechanism on the back wall of the garage and receive a metal piece. Insert the gear knife into the machine, attach the metal piece, and turn on the machine.
Create the new key following the key design collected earlier. Use the crafted key to unlock the cabinet and obtain the gear shifter.
Inspect the corner box and find an earthworm behind it. Feed the earthworm to the hexagonal dragon by the pool in the dark room and receive a pentagonal plate.
Return to the garage, insert the plate into the groove of a box to unlock it and collect the fuel pipe.
Attach the fuel pipe to connect the car and fuel tank, allowing the car to refuel.
Install the gear shifter inside the car to complete the chapter.


