

The story of Dream Escape Room Escape is about a girl suffering from nightmares. She recently moved to a jungle and started to live in a wooden house fully loaded with suspense, thrill, and dark secrets. The strange things started to happen as the protagonist’s beloved uncle passed away inherited his remaining.
Meanwhile, she moved to a wooden house and seeking for your help to solve the most complicated puzzles of her dream. Solving puzzles is possible by collecting hidden items surrounding you, examining objects, and interacting with the correct corner where danger is lurking. In Dream Escape Walkthrough, you will learn everything in step-by-step guide.
Chapter 2 Walkthrough
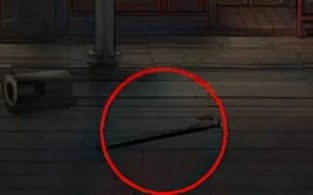
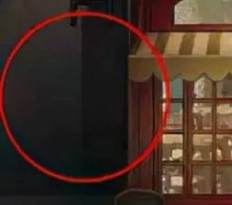
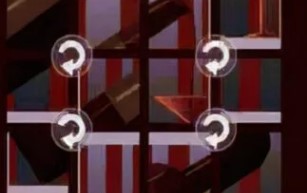
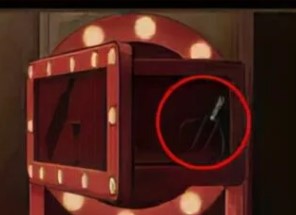
First, pick up the walking stick lying on the ground and pull down the left-side stairs using it. Rotate the neon billboard puzzle to reveal and collect the hidden scissors.
Climb to the second floor, cut the rope with the scissors, and pick up the rope. Examine the formulas in the cat’s eye, at the sewer entrance, and on the antique shop door.
Calculate the result (64), use it to open room 201, and retrieve the card stuck in the door crack.
Return outside and insert the card into the billboard slot on the fence gate to reveal the password WARN.
Use WARN to open the electric box and obtain an iron hook. Tie the hook to the rope to form a grappling device, then fish the key from the sewer grate.
Use the key to open the restaurant door and enter. Pick up the lighter from the table. Use the scale on the table to weigh ingredients; note: ham=4, potatoes=3, pork=5, garlic=1.
Enter these weights to open the cabinet and acquire sulfur. Place sulfur in the brazier before the mouse hole.
Retrieve a cup of kerosene from under the table stove. Attach kerosene to the lighter to create an oil-filled lighter.
Light the sulfur and note the four symbolic clues displayed on the brazier. Use these symbols to unlock the table drawer and retrieve a fan.
Fan the brazier’s smoke into the mouse hole to coax out a mouse and pick up its dropped knob. Return outside, attach the knob to the mailbox by the restaurant, open it, and collect a stick.
Back inside, solve the wall’s cow puzzle to obtain a blade. Use the blade to loosen four screws on the ventilation duct and collect a button battery and fish bones.
Pick up the alarm clock from the street. Insert the button battery and note the number displayed.
Return to the restaurant, enter that number into the cash register, and take the hammer head within.
Combine the hammer head and walking-stick to form a claw hammer (nail remover). Use it to pry nails from window planks and collect the planks. Go upstairs and use the planks to repair the broken stairs.

Ascend to the third floor, pick up a small bench and a box from in front of room 301. Place the bench in front of room 302 and take the herbicide from the nearby shelf.
Spray away the thorny vines on the railing handle to retrieve the rotating handle. Return outside, install the handle onto the broken iron railing, and descend into the bar alley.
Use fish bones to feed the cat and collect the fragment from its mouth. Pick up the broom by the door and sweep the pipe to knock down metal fragments.
Retrieve the tweezers from under the carpet. Return to the restaurant and use tweezers to extract fragments from the sink.
Back in the alley, power on the air conditioner and find a piece of paper blown out. Turn on the AC with password PIZZ to reveal the final fragment.
Combine all fragments in the box to unlock it and collect a key. Return upstairs to open the cabinet in room 302 and obtain a coin.
Go outside and insert the coin into the pay phone. Solve the barrel lid puzzle on the phone to obtain tape.
Use tape to mend the neon light wires, revealing a two-line code—combine them to form 6829. Dial 6829 on the phone; a card will drop. Insert the card into the bar door slot to open the bar.
Enter and pick up a bottle cap opener on the floor. Return outside, use a screwdriver to remove a cork and collect a drumhead from the barrel.
Go back into the bar and install the drumhead onto the drum kit. Tear fabric from the bar chair seat to find four paper trays.
Place the trays into the portrait frame on the right wall. Rotate them to form a complete image, then turn four knobs accordingly to open the table drawer and collect a can and tape. Use the tape on the radio to produce sheet music.
Play the drums following the notes to receive two fish fins. Observe the color indicator atop the wine cabinet.
Change the lamp color to retrieve a cassette from one of the bulbs. Insert the cassette into the game console.
Attach the two fins to the fish next to the small door to unlock it. Hand the can to the tramp under the tree to receive a button.
Search the garbage dump to find a spare door handle. Install this handle on a small house, open it, and collect grain.
Scatter the grain by the small house window to lure down a bird; retrieve the letter attached to its leg. Return to the bar, follow the note’s instructions to open a box and collect the moon stone.
Install the red button on the wall mechanism, complete the mini-game, and activate the incinerator.
When done, collect the sun stone from its remains. Place both moon and sun stones into the six-pointed star slot, open its central eye, and retrieve a wooden box.
Inspect the squares on the second floor wall and incinerator; deduce their colors and unlock the third-floor wall mechanism to collect a clockwork.
Install the clockwork into the wooden box and retrieve a bell key. Return outside and use the bell key to open the antique shop door.
Remove the cloth from the shop sign to reveal a yellow “4”. At the table inside, note three colored blocks.
Rotate the doll’s skirt until the blocks match—collect a black “2”. Open the curtains to reveal a blue “2” on a mask.
Open the table drawer and collect a switch and rag. Wipe a plate with the rag to reveal a red “7”.
Compile the four digits—4272—and enter them into the keypad behind the photo frame; a key appears.
Use the key to unlock the birdcage and take its knob. Return upstairs to room 301 and insert the knob into the recorder.
Solve the recorder puzzle to activate a playback mechanism. Return to the antique shop, install the switch on the starry-sky light, then note the hidden letters VOICE within the inverted star lines.
Enter VOICE into the box and collect a star-shaped plate. Open the mask to find a beetle-shaped plate. Place all three plates into the mirror slot to break it and obtain the room 301 key. Return upstairs, open room 301, solve the window puzzle to retrieve an antenna.
Install the antenna on the TV in room 301. Note the arrow symbol behind the pillow and press the matching symbol on the TV to reveal a colored letter: fate. Use fate to unlock the bedside drawer and extract a key mold.
Pick up a goat horn from the drawer. Search under the bed to find a telescoping ladder. Return to the garbage dump, use the ladder against the dead tree to fetch antlers.
Insert the goat horn into the statue to release a coin. Use the antlers on the deer head sculpture to obtain a second coin.
Back on the second floor, install both coins into the wall mechanism and observe the villain’s animation. Return to room 301, replicate the villain’s pose above the clothes hanger to progress.
Examine the wall map and match four picture coordinates to read code 3457. Input 3457 into the ground box and collect a beaker.
Pick up a metal frame nearby and assemble it with the beaker. Place the assembly on the first-floor stove.
Insert the tin block into the beaker and melt it to create a tin cup. Pour molten tin into the key mold to cast a key.
Use the newly cast key to open the box under room 301, completing Chapter 2. Dream Escape – Walkthrough


