

What we did in chapter 2 is really challenging and required detective skills to overcome problems. Now, the chapter 3 is unlocked and ready to reveal new surprises. Following up your weird dreams, you are going to navigate the jungle one more time with objective of collecting items like wooden stick and garden shovel. Soon, you will see a streetlamp puzzle and need to note down three symbols.
After completing all puzzles, you will discover a hint in the lampshade with a goal of setting the clock tower time. Once you solve the puzzle, obtain a cube and put it on the ground to install in the electric box. Solve the puzzle and go back to the courtyard where you must insert the tool into the statue and get the letter to unlock the chapter 4. We’ve compiled a detailed guide for players who need help to learn how to solve puzzles.
Chapter 3 Walkthrough
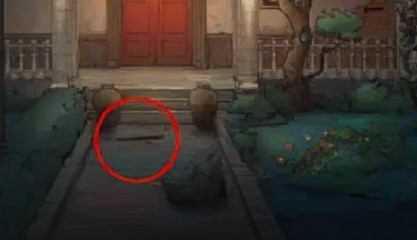
First, pick up the wooden stick from the ground and use it to pry open the stone, revealing a garden shovel. Use the shovel to dig and collect the potato card.
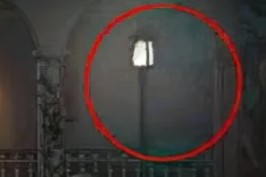
Solve the streetlamp puzzle to retrieve the pointer hidden in the lampshade. Rip away vines from the pillars, note the three symbols, and install the pointer on the bench. Turn it according to those symbols to obtain the flower card and a barrel. Pick up the screwdriver.
Use a bucket to collect water and pour it into the tree hole to get the mushroom card. Place the lily card on the “Spring” portrait, the potato card on “Summer,” and the mushroom card on “Autumn” to earn a key. Use the key to open the door. Grab the puppet torso from the cart.
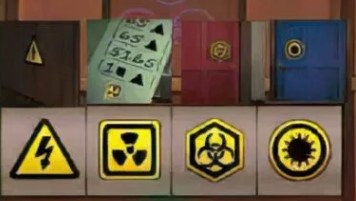
Inspect the fire hydrant to find rubber gloves. In the corridor, reconnect wires in the electrical box. Observe warning signs on the blue and red doors, then take the thin tube from the elevator.
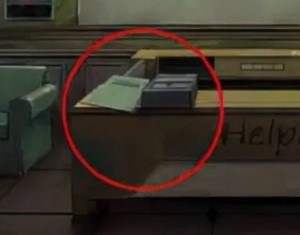
Review the warnings on the visitor registration form.
Return to the hall and, based on the symbol shapes, retrieve the puppet’s left leg from the cabinet.
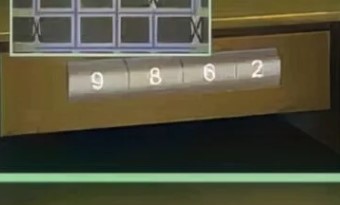
Pick up the kettle in the hall and use it on the white paper to reveal the password 9862. Enter the password into the drawer to get half of a nut holder.
Collect another nut clip and a switch button in the corridor. Install the switch on the wheelchair to take the puppet’s left arm.
Finish constructing the nut clamp and use it to pick nuts from the green plants. Crack open a nut to find the water-drop stone.
Attach the water-drop stone to the box on the table to find the puppet’s right leg. Note the single brown bell symbol on the pillow, then shake it following the sequence yellow, yellow, brown, purple, purple, purple, blue, blue, blue, blue to gain the puppet’s right arm.
Assemble the puppet’s limbs and torso to get the blue key. Use the blue key to open the blue door. Retrieve eyepieces from the beak-shaped mask and observe the wall symbols through them.
Grab the snake head statue from the hospital bed.
Open the water tank with the screwdriver to collect the broken copper bell. Remove the bell’s copper tongue and install it into the bell above the dog’s head.
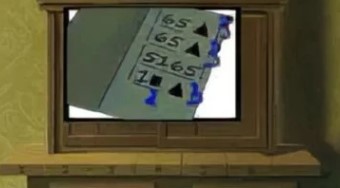
Ring the bell, note the code printed under the dog, and take the box of nails beside it. Decode the music code 653 653 5165 123 to open the cabinet and retrieve lubricant and a wooden stick.
Lubricate the pillow zipper to extract the rocker. In the ward area, use the rocker on the end-of-bed mechanism to find an iron hook under the bed. Combine the iron hook, wooden stick, and nail to create a long iron hook.
Fish hair out of the bathtub with it to collect a key at the bottom. Use the key to enter the purple-doored room.
Take the glacial acetic acid and small resistor from the drawer and table. Use the acid to dissolve sodium silicate and obtain a frosted glass piece.
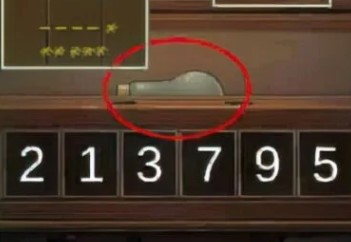
Inspect the closet’s Morse-code clues and use 213795 to open the suitcase. Install the ray lamp and frosted glass into the X‑ray machine, then decode the display pattern to get 8653, unlocking the cabinet to reveal a gear.
Rip paper from the wall and take a key near the deer head. Back at the blue-door room, open the restraint bed to find an electric grinder.
Return to the purple-door room and use the grinder to chip away cement—though it breaks. Apply acetic acid to clean rust off the window and obtain another rocker.
Go to the hallway, install the gear on the golden door, and turn its knobs to enter. Inspect the green corridor door and collect half a track from a lamp in the golden room.
Find and assemble the other half from the box on the floor to complete the track. Install the track beneath the dense cabinet and push it aside to access the wet note inside a cup and tape from cabinet #2.
Return to the purple room, use the tape to fix broken wires and reactivate the radiator. Dry the wet note on the radiator to reveal a code.
Back in the golden room, open cabinet 3 and take the code board, installing it on the projector. Turn off lights, use paper and code board clues to identify the correct cabinet and retrieve a hammer.
Use the hammer on the deer head to find a gold coin. Head to the courtyard and feed the coin into the candy machine to get a small disc for the electric grinder.
Repair the grinder with the disc. Return to the golden room, cut barbed wire with the grinder, and collect a red key.
Find the small resistor behind the sticky flyboard. Open the red corridor door and pick up a telescopic rod missing its rocker.
Collect knobs and a clock from the cabinet and attach the rocker to the rod, forming an extension rod.
Use the rod to dismantle the lamp’s charging cable.
Retrieve a small resistor and battery from under the bed. Combine the battery and cable. Locate a weight by the socket and fully charge the assembly.
Use the charged battery to power the operating lamp, casting a bed-needle shadow. Adjust the desk clock to match the shadow angle and receive the hippocampus key.
Return to the purple room to collect weights from the cabinet. Go back to the golden room, install the knob on the mousetrap, and obtain another weight.
In the red-door room, add reactants per the line graph to obtain weights. Place all four weights on the balance to open a hidden cabinet and take translucent paper.
Open the curtains, overlay the translucent paper on the portrait to reveal 3692, and use it to unlock the manhole. Finish the minigame beneath the manhole to get the green key.
Use it to open the green-door room and enter. Pick up a switch from the table and mount it on the ultra-clean workbench to unlock its compartment and obtain the wrench body and a metal piece.
Check the stool under the refrigerator for a key and small green bead. Use the key to open the test-bench cabinet and collect a vacuum cleaner.
Attach the hose to complete the cleaner, then use it to vacuum green beads from a bucket. Take a whiteboard that reveals colors.
Return to the golden room, open cabinet 4, and get the remaining wrench parts. Assemble the wrench and use it to unlock the refrigerator, taking a petri dish and color developer.
Spray the developer onto the silicone plate to reveal a snake pattern. Place two green beads on the table box to unlock it.
Install the snake head statue into the box’s mechanism, align it to match the snake pattern, and obtain a key.
Complete the potion-cabinet puzzle to reveal a hidden door. Use the key to enter the secret room. Pick petals scattered in the room.
Open the shark-model glass cover with the metal piece to collect more petals. Grab the anesthetic and small resistor from the table.
Feed the potion to the goat, then take a dagger from its horn. Use the dagger to cut open the pheasant and extract a pyramid metal block.
In the purple room, insert the block into the table recess to get a projector slide. In the secret room, place the slide into the projector to receive the password “core.”
Use it to open the box and reveal a clockwork. Install the spring into the owl statue, rotate its head, and collect the petals stored inside.
Attach the three collected petals into the fish tank box to retrieve the elevator handle. Enter the elevator, install resistor and handle, pull the lever, and ascend to the second floor. Use the telescope to observe four planet positions.
Return to the elevator, light a stool lamp to match planet signals, and retrieve another slide. Return to the secret room, insert the slide to reveal password 3428, and open the box to collect a hook.
Install the hook onto the broken iron chain. Check the elevator car lampshade until clues appear.
Using the lampshade hint, adjust the clock-tower time to 5:50. Take the cube on the ground. Install the cube into the electric box, finish the puzzle, and get a hand tool.
Return to the courtyard, insert the tool into the statue groove, and collect a letter—ending Chapter 3.


