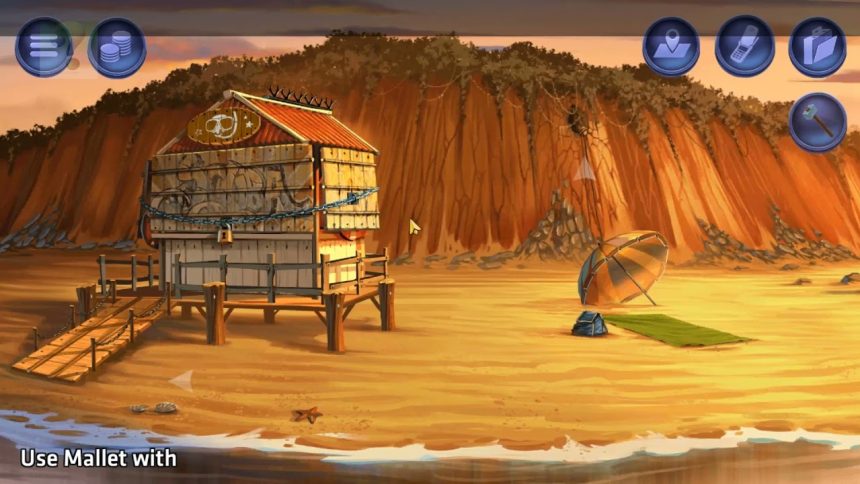
This third mission in your cleanup campaign takes you from sun-soaked shores to the depths of an abandoned mine. It is a job that require precision, cold efficiency, and puzzle solving skills. You have to manipulate beachgoers, sneak into restricted areas, eliminate multiple targets, and make sure nothing, not even a photograph, links you to the crimes.
Tools are scattered across the map: a jack to fake an earthquake, a mallet for destruction, a fishbone to clear a path. Your goal? Tie up loose ends, dispose of bodies, and collect a bit of damning evidence along the way. The environment itself becomes your weapon as you orchestrate accidents and eliminate witnesses.
Operation 6 Canary Walkthrough


Damning Evidence – Photograph the mine map
Serial Killer – 2/10
- Go left and enter the mine. Follow this path: Left → Left → Right (Area 01).
- Use the bird spikes again to kill the miner and exit.
Serial Killer – 3/10
- Go left, and use the bird spikes on the bulldozer.
- Pick up the spikes and also take the jack. Use the jack on the office to simulate an earthquake.
- Re-enter the mine.
- Open the map → Go to Area 01 and pick up the mallet.
- Return to Entrance, then enter the mine again. Follow this path: Left → Middle → Right → Right (Hazard).
- Exit, re-enter, and follow: Right → Middle → Middle → Right → Left → Right (Area 02).
- Pick up the rope.
- Go to Entrance again. Re-enter the mine: Right → Middle → Left → Right → Right → Left.
- Grab the hat (collectible 3/6).
- Now follow: Right → Middle → Left → Right → Left → Right → Middle.
- Use the rope on the rock and climb down.
- Return to the beach and smash the hut with the mallet to get the oxygen tank.
- Go left, open the trunk, pick up the body, and close it again.
- Head back up to the rope and attach the body to it.
- Climb up, pull the rope, and grab the body.
- Open the map and go to Hazard.
- Combine the body and the oxygen tank at the warning sign.
- Use the mallet to detonate the tank and dispose of the body.
- Return to Area 01 and put the mallet back.
- Return to Area 02 and put the rope back.
- At the Entrance, use the jack to fix the bulldozer, and place the pliers on the ground.
- Head right and up to the beach. Close the hut.
- Return the bird spikes and the camera.
- Go left and place the uniform back in the car.
- Throw the photo into the trash.
- Complete the mission.
| ✅ | Task | Location / Action |
|---|---|---|
| Pick up the uniform | From the car | |
| Grab fishbone | Head up to the beach | |
| Use fishbone on sunbathers | Scare them away | |
| Pick up camera | Where the couple was | |
| Go left twice & collect pliers | Found on ground | |
| Go right, up to beach | Use pliers on hut | |
| Collect bird spikes | From hut roof | |
| Enter office, kill boss with spikes | Use bird spikes inside | |
| Photograph mine map | Use camera after boss dies | |
| Enter mine | Go left into mine | |
| Kill miner with spikes | Path: Left → Left → Right (Area 01) | |
| Use spikes on bulldozer | Go left | |
| Pick up spikes & jack | Take both items | |
| Use jack on office | Simulate an earthquake | |
| Re-enter mine | Via map | |
| Pick up mallet | Map → Area 01 | |
| Enter mine, path to Hazard | Left → Middle → Right → Right | |
| Go to Area 02, pick up rope | Follow: Right → Middle → Middle → Right → Left → Right | |
| Re-enter mine, get hat (3/6) | Right → Middle → Left → Right → Right → Left | |
| Use rope to climb rock | Right → Middle → Left → Right → Left → Right → Middle | |
| Smash hut with mallet | Back at beach | |
| Take oxygen tank | Inside smashed hut | |
| Open trunk, take body | Go left from beach | |
| Attach body to rope | Climb back up and tie it | |
| Pull rope to retrieve body | Lift body up | |
| Go to Hazard | Via map | |
| Combine body + tank | Near warning sign | |
| Use mallet to detonate tank | Dispose of body | |
| Return mallet to Area 01 | Use map | |
| Return rope to Area 02 | Use map | |
| Fix bulldozer with jack | Back at entrance | |
| Place pliers on ground | At entrance | |
| Close beach hut | Head up to beach | |
| Return bird spikes | To hut | |
| Return camera | Same location | |
| Place uniform back in car | Original spot | |
| Throw photo into trash | Dispose of evidence |
Returning Objects
- Place the mallet back in Area 01.
- Return the rope to Area 02.
- Use the jack to fix the bulldozer at the Entrance, then leave the pliers on the ground.
- Close the hut and return both the bird spikes and the camera.
- Put the uniform back in the car.
- Throw the photo into the trash.
We’ve completed the operation 6 successfully. Now, it’s time to figure out Operation 7.